Friday

GIANT Magnet board: CARS

We love our GIANT magnet board and I was wanting to find some other ways to use it. 
If your new to this blog check out these other FUN things we have done with our giant magnet board (which is actually a $10 oil pan from walmart) 


For Christmas my son received this busy book it came with the mat and some toy cars, I decided to tape the mat onto the magnet board. 

His Grandma just gave him this tin of Cars magnets for his upcoming birthday so it was a perfect match for our new magnet car mat*

Now unless your child is a Cars lover like mine, you may not have these things but I was thinking how easy it would be to make your own fun magnets with any of your child's favorite interests! 

You could simply buy a pack of stickers and some magnet sheets like these. 


Stick the sticker onto the magnet sheet and cut them out. Instant fun magnets*** For a background you could print something out on your computer or draw a scene on a piece of paper and even let your kids color the background* 

I would love to here the creative ways your using your giant magnet boards*** 


Monday

Valentine's Day: Idea Hop


Day 6 of our week of LOVE countdown


If you have been following along with our 7 days of love projects you might be wondering, what happened to days 5 &6? Well, I have had 2 sick babies and the hubby surprised ME with an early Valentine's Date to Ovo Cirque Du Soleil*** It was AMAZING***

Sorry blogging world for the missed posts but to catch up on those days, here is a great Valentine's Idea Hop*** CHECK IT OUT for some AMAZING ideas****


Check out the LINK below


Living at the Whitehead's Zoo: Valentine Ideas Hop:

Valentine's Day: Past projects we LOVED.

Day 5 of our week of LOVE countdown

If you have been following along with our 7 days of love projects you might be wondering, what happened to days 5 &6? Well, I have had 2 sick babies and the hubby surprised ME with an early Valentine's Date to Ovo Cirque Du Soleil*** It was AMAZING*** Sorry blogging world for the missed posts but to catch up on those days, here are a few projects we did last year for Valentine's Day. I LOVE the flower made out of a water bottle. I actually make these with my preschoolers every year for Mother's Day gifts* They are always a BIG hit** 


Up-cycled Flowers 

What you will need:


*
a water bottle
*acrylic paint (any other kind will chip)
*tissue paper
*straw or pipe cleaner


Cut the top off of the water bottle


Cut slits in up the sides


Bend down each slit


and you have a flower!


Turn the flower cap side up and allow your child to paint it! (remember acrylic paint is the only paint that won't chip off)


This is what it looks like when you turn it around.


Let it dry then roll up a small ball of yellow tissue paper and stick it in the middle of the flower. Tape a straw to the back for a stem or wrap a pipe cleaner around making a stem. We took the bottom of the water bottle and stuffed it with some tissue paper as a vase...you could let your little ones paint or decorate the 'vase' as well!


Valentine's Day Fortune Cookies


Ingredients you will need:


8 eggs whites

1 cup melted butter (use 1 cup oil instead to keep the calories down)
1 teaspoon vanilla
4 tablespoons water
2 cups sugar
1 cup flour
1/2 teaspoon salt


Separate the egg whites and beat them until they form stiff peaks. Blend in the sugar and butter. (Discard egg yolks) Add the flour, vanilla, salt and water to the mixture and mix until smooth.


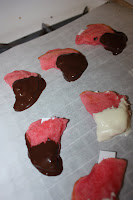
We put in red food coloring to make 'pink' fortune cookies for Valentine's Day!


Grease a cookie sheet or use parchment paper. Spoon the batter into 3 inch circles. Bake at 375* for about 4-5 minutes.


While those are cooking, write a few love notes or 'fortunes' for your loved ones!


When the cookies are done, remove them with a pancake turner onto wax paper or parchment paper. Place your love note or 'fortune' in the center of each circle and fold the cookie in half. Bend the cookies gently in the center. (If the cookies get to hard to bend, put them back in the oven for a minute or so)


We dipped ours in Chocolate to make them even more special for valentines day!


Friday

Valentine's Day: Homemade playdough gifts (PART 2: cute packaging)

Day 4 of our week of LOVE countdown


 So in my last post I told you I was working on some super cute packaging to hold our homemade play-dough that were giving out to a few friends for Valentine's day. This post has a lot of pictures but I just love how they came out*

So I really wanted to buy mason jars but I'm trying to be very frugal so this is what I stared out with. 

 I saved a few jars and our formula cans, I spray painted the tops with chalkboard paint. 


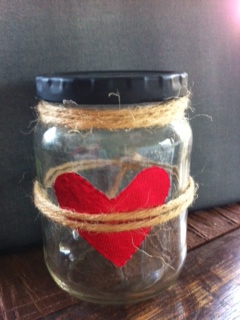
  For the jars I cut the middle out of a heart shaped doily and wrapped twine around it. Aren't they cute?** I wrote on the tops with chalk. 


For the formula cans I cut 12x12 scrapbook paper to fit, glued it with scrapbook glue, wrapped them with doilies and twine. 


The best part about this.....I didn't spend a penny*

Tomorrow we will fill them with our pink and purple homemade play-dough and bring them to our friends. 


**check back each day for fun crafts on our 7 days of love countdown* 


Inspiration for this projects can be found 

here  

and 

here 

 :) 

Thursday

Valentine's Day: Homemade playdough gifts

Day 3 of our week of LOVE countdown


 My son is not in school yet to exchange Valentine's so we are making a few Valentine's Day gifts for some of our family friends and our cousins. Check back tomorrow to see the cute packaging were making to put the play-dough in, I'm pretty excited about how cute it will look.**


Being a preschool teacher for so long I have made too many batches of play-dough to count, but I think this is by far my favorite 


This recipe is for a large batch 

the recipe: 4 cups water, 4 cups flour, 1 cup salt, 2 tablespoons cooking oil, 4 teaspoons cream of tartar, food coloring. Combine all ingredients.

You can find directions for a smaller batch of the same play-dough here


After mixing, I split the batch in half and added food coloring and glitter. 

Cook in a pan over the stove, (I used a non-stick pan but I think any should work fine) stirring constantly, until most of the moisture is absorbed. You will see the color get darker as it starts to cook. It will be ready when it is no longer sticky. Let cool then knead, the more you play with it the softer it will get. You can store it in a zip-lock bag and it does not need to be refrigerated. I made the last batch for my son over a month ago and it's still good* 


**check back each day for fun crafts on our 7 days of love countdown* 


Wednesday

Valentine's Day: make it PINK!

Day 2 of our week of LOVE countdown


What is better than muffins, PINK muffins*

My son loves muffins and blueberry are his favorite, so for day 2 of our countdown to Valentine's Day we made pink muffins.

I bought this heart shaped mold last year in the dollar section of Target. 

We made our muffin mix (you can use any flavor) and added pink food coloring. McCormick makes  Neon colors that have purple, pink, yellow and blue.


 The little man mixed it all up and we poured it in our molds.


 The more food coloring you add the brighter pink they will be. 
 
 
**check back each day for fun crafts on our 7 days of love countdown**

To see Day 1 click here